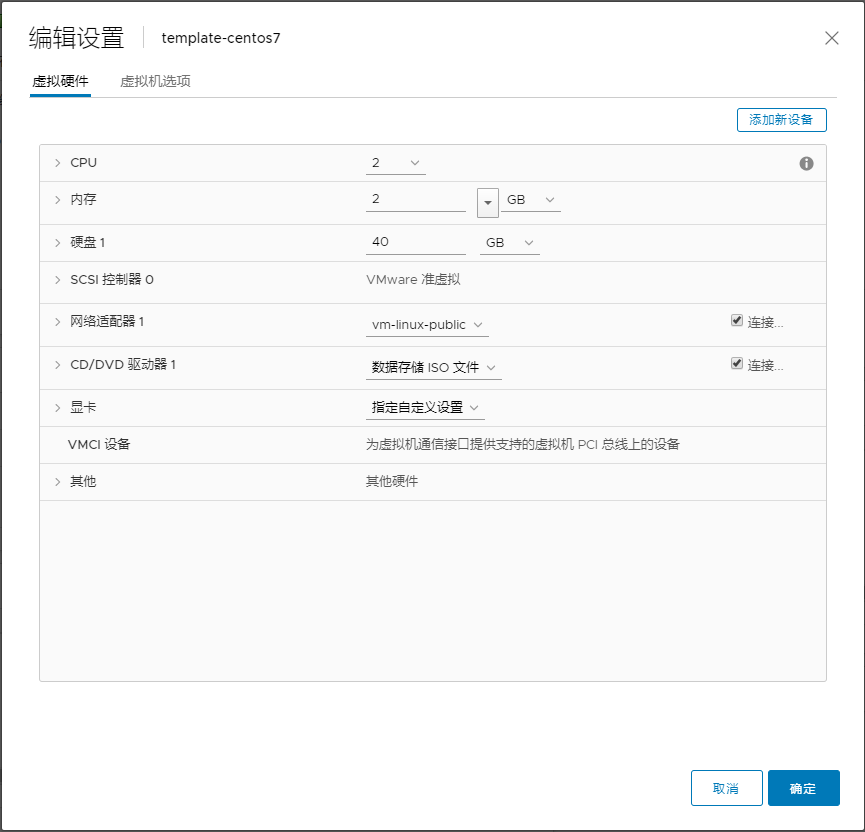
虚拟机设置方式
- 注册新的虚拟机用于模板机的制作,配置可自定义.也可参考如下配置:
设置完后开启模板机,自定义安装方式以及安装安装磁盘配置.我使用的默认安装配置(下一步->下一步)这种!
模板机配置过程
- 修改网卡命名方式:
#备份现有的网卡配置
[root@tempale ~]# cd /etc/sysconfig/network-scripts/
[root@tempale network-scripts]# cp ifcfg-ens192 netconf.cnf
[root@tempale network-scripts]# mv ifcfg-ens192 ifcfg-eth0

#增改配置文件
TYPE="Ethernet"
PROXY_METHOD="none"
BROWSER_ONLY="no"
BOOTPROTO="static"
IPADDR="10.10.1.20"
GATEWAY="10.10.1.1"
#HWADDR="00:50:56:b6:26:e5" #网卡MAC地址
NETMASK="255.255.255.0"
DNS1="10.10.1.1"
DEFROUTE="yes"
#NM_CONTROLLED="no" #是否支持network程序管理
IPV4_FAILURE_FATAL="no"
IPV6INIT="yes"
IPV6_AUTOCONF="yes"
IPV6_DEFROUTE="yes"
IPV6_FAILURE_FATAL="no"
IPV6_ADDR_GEN_MODE="stable-privacy"
NAME="eth0"
#UUID="7c23c4fb-636a-4bf4-9e9a-c059030f2676" #网卡UUID
DEVICE="eth0"
ONBOOT="yes"
USERDNS="no" #普通用户是否可以操作网卡
#主要修改:网卡IP 掩码 DNS,可选修改:MAC UUID IP获取方式 普通用户是否支持网卡操作


#修改引导配置文件后生成新引导配置文件
[root@tempale ~]# vi /etc/default/grub
GRUB_CMDLINE_LINUX="net.ifnames=0 biosnames=0 rd.lvm.lv=centos/root rd.lvm.lv=centos/swap rhgb quiet"
[root@tempale ~]# grub2-mkconfig -o /boot/grub2/grub.cfg


#重启系统
[root@tempale ~]# reboot
[root@tempale ~]# ifconfig
eth0: flags=4163<UP,BROADCAST,RUNNING,MULTICAST>  mtu 1500
        inet 10.10.1.20  netmask 255.255.255.0  broadcast 10.10.1.255
        inet6 fe80::fd1f:ad80:1c03:f833  prefixlen 64  scopeid 0x20<link>
        ether 00:50:56:b6:26:e5  txqueuelen 1000  (Ethernet)
        RX packets 98  bytes 10123 (9.8 KiB)
        RX errors 0  dropped 0  overruns 0  frame 0
        TX packets 104  bytes 10893 (10.6 KiB)
        TX errors 0  dropped 0 overruns 0  carrier 0  collisions 0
- 需要注意的是:网卡配置文件指定了dns的话那和
/etc/resolv.conf中的记录会自动生成和网卡配置文件的中dns地址,所以CentOS中如果网卡中配置了DNS那么不需要重复在/etc/resolv.conf中再重复指定DNS了。如果不想在网卡中配置DNS那么可以直接在/etc/resolv.conf文件中配置DNS。
- 修改源后安装常用工具:
#修改为aliyun源
[root@template yum]# cd /etc/yum.repos.d/
[root@tempale yum.repos.d]# mv CentOS-Base.repo CentOS-Base.repo.back
[root@tempale yum.repos.d]# curl -o /etc/yum.repos.d/CentOS-Base.repo http://mirrors.aliyun.com/repo/Centos-7.repo
#生成缓存
[root@tempale yum.repos.d]# yum makecache
#安装常用软件
[root@tempale yum.repos.d]# yum install -y vim wget git net-tools bash-completion epel-release htop
#安装开发包
[root@tempale ~]# yum groupinstall -y "Development Tools"

#修改epel源
[root@tempale yum.repos.d]# mv /etc/yum.repos.d/epel.repo /etc/yum.repos.d/epel.repo.backup && mv /etc/yum.repos.d/epel-testing.repo /etc/yum.repos.d/epel-testing.repo.backup
[root@template ~]# wget -O /etc/yum.repos.d/epel.repo http://mirrors.aliyun.com/repo/epel-7.repo
[root@tempale yum.repos.d]# yum makecache
[root@tempale yum.repos.d]# yum repolist
Loaded plugins: fastestmirror
Loading mirror speeds from cached hostfile
 * base: mirrors.aliyun.com
 * extras: mirrors.aliyun.com
 * updates: mirrors.aliyun.com
repo id                                           repo name                                                                                 status
base/7/x86_64                                     CentOS-7 - Base - mirrors.aliyun.com                                                      10,097
epel/x86_64                                       Extra Packages for Enterprise Linux 7 - x86_64                                            13,518
extras/7/x86_64                                   CentOS-7 - Extras - mirrors.aliyun.com                                                       323
updates/7/x86_64                                  CentOS-7 - Updates - mirrors.aliyun.com                                                    1,117
repolist: 25,055- 系统配置:
#关闭selinux
[root@tempale yum.repos.d]# sed -i 's/SELINUX=enforcing/SELINUX=disabled/g' /etc/selinux/config
[root@tempale ~]# grep 'SELINUX=' /etc/selinux/config
# SELINUX= can take one of these three values:
SELINUX=disabled
- 配置ssh秘钥登录
#windows使用xshell生成秘钥,linux生成秘钥如下:
[root@tempale .ssh]# ssh-keygen -t rsa -b 4096
Generating public/private rsa key pair.
Enter file in which to save the key (/root/.ssh/id_rsa):  #保存路径
Enter passphrase (empty for no passphrase):  #秘钥密码
Enter same passphrase again:    #重复秘钥
Your identification has been saved in /root/.ssh/id_rsa.
Your public key has been saved in /root/.ssh/id_rsa.pub.
[root@tempale .ssh]# cat id_rsa.pub  #秘钥存放路径

#手动导入公钥
[root@tempale .ssh]# cd && mkdir .ssh && cd .ssh
[root@tempale .ssh]# vim authorized_keys #把公钥复制进去- 更新系统
[root@tempale .ssh]# yum update如果没必要的话还是不建议更新的,因为更新后未知问题非常多.
- 内核参数优化
#设置最大文件描述符
[root@tempale ~]# vim /etc/security/limits.conf
*               hard    nofile          102400
*               soft    mofile          102400

#内核参数优化
[root@tempale ~]# vim /etc/sysctl.conf
vm.overcommit_memory = 1
net.ipv4.ip_local_port_range = 1024 65000
net.ipv4.tcp_fin_timeout = 1
net.ipv4.tcp_keepalive_time = 1200
net.ipv4.tcp_mem = 94500000 915000000 927000000
net.ipv4.tcp_syncookies = 1
net.ipv4.tcp_tw_reuse = 1
net.ipv4.tcp_tw_recycle = 1
net.ipv4.tcp_fin_timeout=120
net.ipv4.tcp_keepalive_time = 2400
net.ipv4.tcp_max_syn_backlog = 8192
net.ipv4.tcp_max_tw_buckets = 5000
net.ipv4.tcp_timestamps = 0
net.ipv4.tcp_synack_retries = 1
net.ipv4.tcp_syn_retries = 1
net.ipv4.tcp_abort_on_overflow = 0
net.core.rmem_max = 16777216
net.core.wmem_max = 16777216
net.core.netdev_max_backlog = 262144
net.core.somaxconn = 20480
net.ipv4.tcp_max_orphans = 3276800
net.ipv4.tcp_max_syn_backlog = 262144
net.core.wmem_default = 8388608
net.core.rmem_default = 8388608
net.nf_conntrack_max = 655360
net.netfilter.nf_conntrack_tcp_timeout_established = 1200
[root@tempale ~]# sysctl -p内核参数优化详细解释:https://www.lagou.com/lgeduarticle/55640.html
- 删除模板机操作日志
#主要的日志文件:dmesg secure messages yum.log
[root@tempale ~]# cd /var/log/
[root@tempale log]# echo "" > messages && echo "" > secure && echo "" > dmesg && echo "" > yum.log

#删除history信息
[root@tempale ~]# echo "" > .bash_history
[root@tempale ~]# history -c
版权属于:龙之介大人
本文链接:https://www.i7dom.cn/228/2020/07/template-centos.html
本站所有原创文章采用知识共享署名-非商业性使用-相同方式共享 4.0 国际许可协议进行许可。 您可以自由的转载和修改,但请务必注明文章来源和作者署名并说明文章非原创且不可用于商业目的。
